A couple of years ago I posted “Blazing Geo Lookups! How To Install Maxmind PHP Extension on Your Server” which detailed how to get the Maxmind’s GeoIP database setup on your server.
Since then, Maxmind has updated their database format to “GeoIP2”. This new format is supposed to be better/faster, etc. Sounds great. But the new format also requires a different method of setup.
Unfortunately, the documentation on how to get this set up from start to finish is still non-existent.
While going through this set up process myself, I ran into a handful of problems. Most of them were small, but some required a lot of searching and trying different things to figure out what was wrong. To help you avoid the same issues, I decided to create this walk-through and note any problems you might have.
What’s in the box
At the end of this walk-through, you’ll have:
(1) The latest GeoLite2-City db installed
(2) The latest PHP API installed
(3) The optional PHP C Extension installed
(4) A feeling of warm satisfaction and accomplishment
Note: These install instructions are for Centos 6.5 Final. They should work for other Centos versions. You’ll also probably be able to follow this guide on Ubuntu as well. But some commands like “yum” will need to be changed.
I. Installing the Database
First up, let’s download the latest GeoLite2-City database. Open up your Putty SSH Client (see: “Affiliate’s Guide to SSH – Part 1“) and login to your server.
Note: For the purposes of this tutorial, my working directory will be “/root”.
The database is a bit hard to find, but here is the download page. http://dev.maxmind.com/geoip/geoip2/geolite2/
We want theGeoLite2 City Maxmind DB. (Not the CSV). If you hover over the link, you can right-click and “Copy Link Location”.
Now that we’ve got the URL, we can use wget to download it to our server, unzip it, and move it to the proper directory. Here are the commands do just that.
Note: Rather than blindly copying & pasting these lines, I encourage you to spend a moment to think about what you’re doing. Being familiar with the command line is a good thing 😉
wget http://geolite.maxmind.com/download/geoip/database/GeoLite2-City.mmdb.gz
gunzip GeoLite2-City.mmdb.gz
mkdir /usr/local/share/GeoIP
mv GeoLite2-City.mmdb /usr/local/share/GeoIP/
The database is now installed, but we can’t really make any use of it until we install an API.
II. Installing the PHP API
Since we’ll be using our database with PHP, we’re going to be using the PHP API. The API is available through Composer. Composer is “dependency manager” (i.e. package manager) for PHP. To use Composer you first need to install it. So we’ll be using the instructions I found here: https://getcomposer.org/doc/00-intro.md#installation-nix
In your terminal run:
curl -sS https://getcomposer.org/installer | php
This will download “composer.phar” to your working directory. (Whatever directory you’re currently in).
Here’s a screenshot of my Putty session.
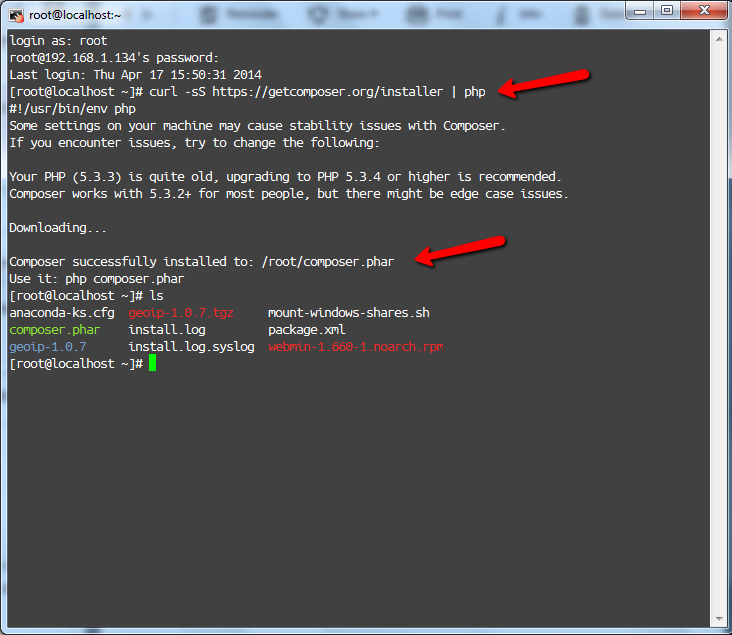
You can see I get the message “Composer successfully installed to /root/composer.phar” — it’s telling me where it put this .phar file.
OK so now it’s time to use Composer to grab the geoip2 package. (See: https://packagist.org/packages/geoip2/geoip2 and https://github.com/maxmind/GeoIP2-php)
We need to create a .json file that tells Composer what we want to install. So back to the terminal:
vi composer.json
Type i (To “Insert”). Then paste this:
{
    "require": {
    "geoip2/geoip2": "0.6.*"
    }
}
Then type :wq (That’s colon+w+q) To save the file.
There will now be a new .json file in your working directory. Now, back in the shell, execute this command:
php composer.phar install
If all goes well, Composer will grab all the stuff we need.
In my case, things did not go smoothly. I received this message:
Loading composer repositories with package information
Installing dependencies (including require-dev)
Your requirements could not be resolved to an installable set of packages.Problem 1
– maxmind-db/reader v0.3.0 requires ext-bcmath * -> the requested PHP extension bcmath is missing from your system.
– geoip2/geoip2 v0.6.0 requires maxmind-db/reader 0.3.* -> satisfiable by maxmind-db/reader[v0.3.0].
– Installation request for geoip2/geoip2 0.6.* -> satisfiable by geoip2/geoip2[v0.6.0].
Composer is complaining that “bcmath” is not installed. To fix that is pretty simple:
yum install php-bcmath
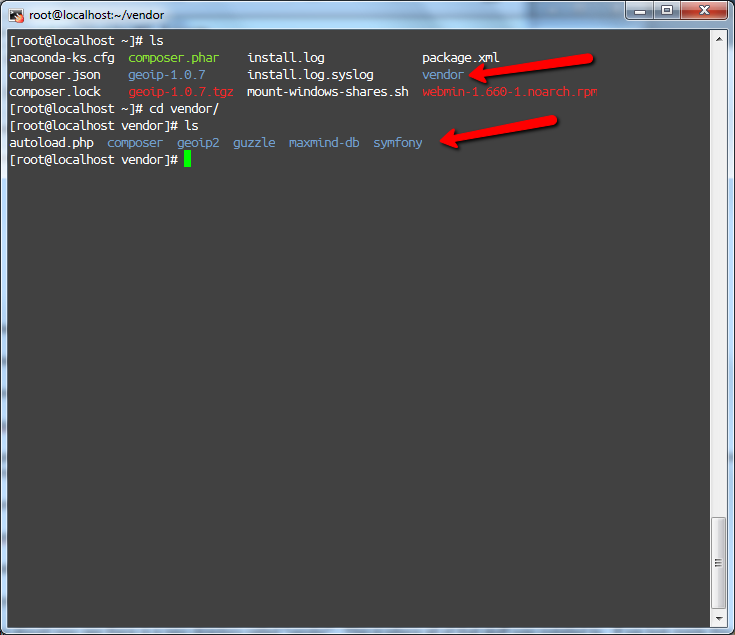
Trying the composer install command, it now works. Yay!
You should now see there is a new directory called “vendor”. This is where all of that stuff was installed to. Here’s a screenshot of what you should see.
If you run the sample code now, Geo lookups should work and everything should be peachy.
If you’re happy with slow Geo lookups you can stop here and skip to section VI.
But I want FAST Geo lookups. So I’ll need to install the PHP C Extension. You should want FAST Geo lookups too! 😉
III. Install C Library for Maxmind DB Format
The PHP C Extension requires the use of the C Library. (Remember I said this could be confusing?)
Have no fear, you can just keep following along.
Note: For reference purposes This page details some directions on how to do this https://github.com/maxmind/MaxMind-DB-Reader-php also https://github.com/maxmind/libmaxminddb
It may be tempting to just download the Master.zip from Github but that did not work for me. Instead I needed to use Git to clone the repository. Nothing else seemed to work.
First, make sure Git is installed and do this:
yum install git
Now we can use git to clone the repository.
git clone --recursive https://github.com/maxmind/libmaxminddb
Now run the following commands:
Note: Pay close attention to the output after you run ./configure and make check. The system will issue warnings and errors if it encounters a problem. For example I got error regarding “libtool”. To fix it I had to run “yum install libtool” before running ./bootstrap again.
cd libmaxminddb
./bootstrap
./configure
make check
sudo make install
sudo ldconfig
If all goes well, the C Library for the Maxmind DB format is now installed. We can now (finally) install the PHP C Extension.
IV. Install PHP C Extension
To install the PHP extension we need to navigate to a directory inside your vendor directory. So (assuming you’re in /root) do this:
cd /root/vendor/maxmind-db/reader
Now execute the following commands:
Note: if you get “Command not found” after you run “phpize” you need to install PHP Developer tools. Do this: yum install php-devel — then try phpize again.
cd ext
phpize
./configure
make
make test
make install
You should get a message like on 64-bit systems:
Installing shared extensions: /usr/lib64/php/modules/
or this on 32-bit systems:
Installing shared extensions: /usr/lib/php/modules/
The path where your extensions are installed may be different. That’s OK.
V. Configuring the PHP Extension
Now that our PHP Extension is installed we need to tell PHP it’s available. Create a PHP file called “phpinfo.php” somewhere in your web directory with this contents:
<?php
phpinfo();
?>
Now visit the page in your browser. You should see a PHP info page. About 7 rows down you’ll see where it says “Loaded Configuration File” and next to it a path like this:

That’s the file we need to edit. (Your path will likely be different.) So back in the shell:
nano /etc/php.ini
Once inside the Nano editor, scroll all the way to the bottom and add this new line:
extension=maxminddb.so
CTRL-O then Enter to Save.
CTRL-X to exit
Now we need to update the dynamic links for libmaxminddb. Not knowing I need to do this step had me banging my head against the wall for quite some time. Thankfully I found this post: https://github.com/maxmind/MaxMind-DB-Reader-php/issues/7 Thanks to the guy who took the time to post that solution!
Do this:
ldconfig /usr/local/lib
Now we need to restart Apache so PHP “picks up” this new configuration.
service httpd restart
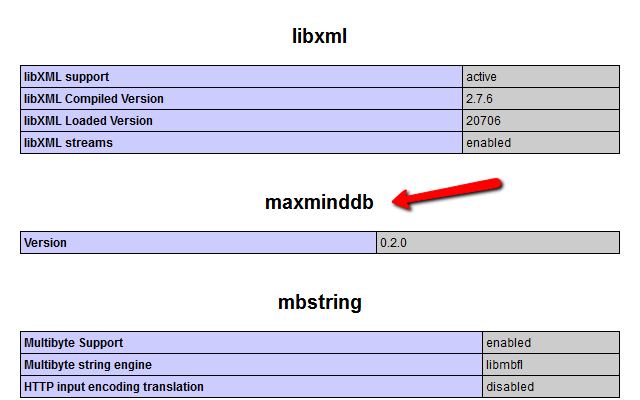
Now refresh that phpinfo.php page in your browser. If you scroll down the page, under Configuration you’ll see extensions in alphabetical order. If all went well, you’ll see the maxminddb extension there too!
VI. Testing
All that’s left is to test everything.
Up until now, our “vendor/” directory has been sitting in root. We need to move or copy it to our www folder so we can use it in our projects or landing pages. We can copy it like this:
cp -r /root/vendor var/www/maxmind
Note: Your destination directory will be different. So change /var/www to wherever you want to copy too. e.g. /home/{username}/www/maxmind
Create a new file called “test.php” the “maxmind” directory and paste in this example code: (from https://github.com/maxmind/GeoIP2-php):
<?php
require_once 'vendor/autoload.php';
use GeoIp2\Database\Reader;

// This creates the Reader object, which should be reused across
// lookups.
$reader = new Reader('/usr/local/share/GeoIP/GeoLite2-City.mmdb');

// Replace "city" with the appropriate method for your database, e.g.,
// "country".
$record = $reader->city('128.101.101.101');

print($record->country->isoCode . "\n"); // 'US'
print($record->country->name . "\n"); // 'United States'
print($record->country->names['zh-CN'] . "\n"); // '美国'

print($record->mostSpecificSubdivision->name . "\n"); // 'Minnesota'
print($record->mostSpecificSubdivision->isoCode . "\n"); // 'MN'

print($record->city->name . "\n"); // 'Minneapolis'

print($record->postal->code . "\n"); // '55455'

print($record->location->latitude . "\n"); // 44.9733
print($record->location->longitude . "\n"); // -93.2323
?>
If you visit the page in your browser you should see some output that shows that the IP on line 11 is located in Minneapolis.
You can modify this to show a users IP dynamically like this:
$record = $reader->city( $_SERVER['REMOTE_ADDR'] );
Conclusion
Phew. This post took forever to create, so if you found it useful please drop me a line below. Also retweets are welcome 😉
I should note that you can use this setup with the paid “GeoIP2” database as well. All you need to do is change the database filename in line 7 above to “GeoIP2-City.mmdb”.
Also, while this focuses on using the PHP API, there are many other APIs offered by Maxmind. The Apache Module was intriguing but it only allows you to do lookups for current visitors IP. For my purposes this was a deal breaker. But if that’s all you want to do, you might want to have a look at that. It may be simpler to install and simpler to use.
And finally… there are a lot of steps to this– that means quite a few things can go wrong along the way. If you run into problems, go back and check your work– you may have mistyped something. If that doesn’t help, try contacting your web host. 90% of this is server configuration so those are the guys to bug if this doesn’t work. You can simply link to my post here and they should be able to follow this quite easily.
Cheers!
before i found this article, I have problem to use maxmind. after i found this article, now I can use it.many thanks for this tutorial.. this is use full..
You’re welcome! Thanks for taking the time to comment.
Seriously?! Nobody could think of even more complicated method to install GeoIP2? There can be issues on every step… Unbelievable…
But it all worked fine… apart some compiler packages missing. Thanks
Unfortunately lots of server packages turn out this way. They are designed to be modular and work with a variety of setups. In there lies the complexity.
Glad you were able to get this working. Thanks for commenting.!
So, I installed it (except the C library and the PHP C Extension) on my local linux machine and it works just fine. If I just copy and paste the files to my hosting provider, and fix the paths of the database will it work? Great article by the way. Thanks!
Hi yeah copying and pasting to your host may work. But if I were you I’d just work through the steps again. It would be safer and guaranteed.
Thanks for reading and taking the time to comment!
Awesome blog. Thanks a ton.
THANK YOU for this post. I was waiting for a simple “hey, `phpize` comes in ___” in the MaxMind docs and just couldn’t find it. Your post was perfect. Surprising how simple this extension was to compile!
Glad you found the post useful. Thanks for letting me know!
I’d like to say, thank you very much
You don’t know how much this article help me
People like you makes the difference
🙂
Thanks for reading!
You are my newest best friend! I’m writing from Argentina. Found your tutorial on Google. And after a couple o little problems get finally to work! Thank you very much 🙂
Thanks for letting me know it helped you. Cheers!
Thank you so much! It’s been a few years since I’ve set up Maxmind and was struggling with the new setup. Your tutorial saved me several hours of screaming and monitor punching.
LOL glad it helped. Thanks for letting me know.
Thanks for this guide! It was absolutely helpful!
Thanks for letting me know it helped. Cheers!
hello,i can’t see any output 🙁
Hello. Excellent tutorial. Everything is ok, except I cannot install C Library. I have an issue with the repisotiry.
Resolving deltas: 100% (2401/2401), done.
Submodule ‘t/libtap’ (git://github.com/zorgnax/libtap.git) registered for path ‘t/libtap’
Submodule ‘t/maxmind-db’ (git://github.com/maxmind/MaxMind-DB.git) registered for path ‘t/maxmind-db’
Initialized empty Git repository in /home/offshore-website/csv/vendor/libmaxminddb/t/libtap/.git/
github.com[0: 192.30.252.129]: errno=Connection timed out
fatal: unable to connect a socket (Connection timed out)
Clone of ‘git://github.com/zorgnax/libtap.git’ into submodule path ‘t/libtap’ failed
So, I had to use the slow solution. This one is running. Do you have a solution for this issue?
Thanks in advance
Looks like some kind of connection problem. Sorry this is probably a good question for your hosting company support team.
Use “git config –global url.”https://”.insteadOf git://” your firewall is blocking git://
Hi, Thank you very much for this post. It was very helpful!
Hi! This post is awesome.
Tip: If you encounter any of these errors while trying to compile PHP extension:
> error: maxminddb.h: No such file or directory
> cannot find -lmaxminddb
then simply run
$ ./configure CXXFLAGS=”-I/usr/local/include/ -L/usr/local/lib/”
instead of just
$ ./configure
In my case required files were located as follows:
/usr/local/include/maxminddb.h
/usr/local/lib/libmaxminddb.so
First of all thanks for the great tutorial.
And second of all, I’ve followed your instructions and successfully installed the extension on PHP v5.4 but, now I’ve upgraded to v5.6 and the extension is gone!
I’ve tried to repeat the steps of the extension installing section but nothing changed.
Is there anything special I’m supposed to do??
Thanks for this well written tutorial!
Nicely explained!
Yes this will do the work for you. Just follow the steps carefully. This one worked. I am glad.
many thanks to ‘ctrtard’. You are awesome
Doesn’t work.
To install GeoIP2 I had to install Guzzle. Maybe that has something to do with it.
Do you have the steps to install geoIp for mmdb database in apache?
I’m also looking for tutorial to install IP2Location LITE, PHP and C in my linux. Do you plan to write one about it?